Thursday, 9 July 2015

HDD vs SSD: Comparsion of the Storage Drives

Until recently, people opting for a mass storage looked down only for Hard Disk Drives (HDD) with various capacities, speed, the warranty provided, etc. But in the recent days we get to hear about what is called Solid State Drives (SSD).
So what is this SSD? How is it different from our conventional HDD? Before coming to all this let me first tell you a little about HDD. Standard Hard Disk Drives contain a set of disks arranged together called platters, which are coated with magnetic coating (this is where the data is stored). Things called drive heads then touch these platters physically and move around them. Thus changing the magnetic coating and storing data. Thus to read or write data onto the hard disk, the drive head touches the platters which we must say, is a bit mechanical. The HDD comes in 3.5 inch form factor (or 2.5 inch for laptops).
An Internal View of an HDD Credits:  Ed
An Internal View of an HDD.
Credits: Ed
                                             But the technology involved in an SSD is quite different. It doesn’t contain things like platters or drive head. All it contains is a simple memory chip (NAND Flash Memory Chip), the same ones used in ipods, memory cards, etc. which can store data even without any power. The SSD usually comes in 2.5 inch form factor or sometimes the chip is even embedded on the motherboard.
An Internal View of SSD. Credits: HP Blade System
An Internal View of SSD.
Credits: HP Blade System

HDD vs SSD

So now you folks might be thinking which is better? A HDD or a SSD! Well this entirely depends on your requirements and your purpose.

Power Consumption

Clearly as the HDD involves a mechanical process of writing the data, the power consumption is quite high. If you own a notebook, then this is where most of your battery is drained. Where as in case of SSD, as there is nothing mechanical involved, the power consumption is quite low. As SSD doesn’t have any moving parts, it doesn’t make any noise. In case of HDD audible clicks and spinning can be heard.

Speed and Performance

In this case SSD beats HDD in a big way. In terms of Copy/Write speed, a SSD does a 200-500 MB/s whereas a HDD just gets near 50-120 MB/s. Comparing the average boot-time (time to get your operating system started), SSD averages at 22 seconds while a HDD does the same in 40 seconds. So if your looking for speed and performance SSD is just right for you.

Storage Capacity and Price

This factor is what disappoints me about SSD. About the storage capacity, the maximum an SSD can currently offer is 512 Gigabytes. Whereas an HDD can offer upto 4 Terabytes of storage.
The SSD is also quite expensive. A Kingston 240 GB SSD costs a whooping Rs.12,500, where as a Seagate 3 TB HDD costs around Rs.9,000.
So a HDD or a SSD entirely depends on your requirements. If you don’t mind shelling out a lot of money for performance, you can go for an SSD. Or if you need great amount of storage capacity, HDD always gets a +1.
That’s not all. To optimize the performance of your PC, you can use both simultaneously. You can use a SSD as your primary drive (Where your Operating System is situated) to optimize boot time, and an HDD to store large amount of data. This method always works economical.

Blue Screen Error: Solutions to the Screen of Death

Blue screen error also known as The Blue screen of death in the tech world, is a stop error causing the windows to display messages saying “Windows has been shut down to prevent damage to your computer in Windows 7 on a blue screen. It is caused due to an unexpected system crash causing the Windows to shut down immediately, later showing a blue screen.
Since most of the computers in the world have upgraded to Windows 7 from Vista/XP, so I will be posting solution for the blue screen error for Windows 7.If You receive a blue screen error, either you will be able to start windows or you won’t be able to start windows at all.
Blue Screen
Blue Screen Error

CASE 1: IF YOU ARE ABLE TO START WINDOWS AFTER BLUE SCREEN APPEARS:

Follow the given steps to take your system back to a previous stable state.

METHOD 1: Use Action Center to check for solutions to the problems that could have arisen.

when software or hardware problems arise Windows generates a report about it. The action center can find whether the reported problem has a solution or not
Step 1.Click Start Button, Select control panel, then under the Systems and Security, select Action Center.
Step 1
Step 1 : Part 1
Step 1: Part 2
Step 1: Part 2

Step 2. Under the review recent messages and resolve problems heading, Select maintenance. 
Step 2-3
Step 2-3
Step 3. Click Check for Solutions and let you windows tell you if there are any solutions to the problems in your computer.
Checking For Solutions

METHOD 2: Use System Restore to undo the recent changes made.

System Restore is used to undo the changes made in the computer’s system files recently, the changes which might have caused the error. The System restore doesn’t damages your personal files, be it your documents or media or emails.
Step 1. Click Start Button, Type System Restore in the Search Bar and then select System restore from the list of options provided.
Step 1
Step 1
Step 2. Follow the instructions as given in the following images.Choose Restore and Click Next. Click Finish for the process to start.
Step 2 - 3
Step 2 – 3
Step 4
Step 4

METHOD 3: Check for Software updates using Windows update

Windows Update from Microsoft might help you in fixing your errors by installing the recent updates dispatched from Microsoft. Manually check the latest software and driver updates to keep your workstation on track and solve system errors.
Step 1. Click Start Button, Type Windows Update in the Search Bar and then select Windows Update from the list of options provided.
Step 1
Step 1
Step 2. Click Check for Updates left hand side and let the windows find new updates for your computer/Laptop.
Step 3.You might find messages telling that updates are available or some updates need review.
Step 4. Click an individual update for further information and go through it, Select the Check boxes of the updates you want to install.
Step 2 - 3 - 4
Step 2 – 3 – 4

Step 5. Click Install updates, Go through and accept the terms and conditions before installing, click finish.
Installation Process
Some more things you can do to solve the error like.

METHOD 4: Troubleshoot errors on safe mode of windows

METHOD 5: Check for damaged memory and hard disk

If the problem persists or for more information visit the Support Site of Microsoft Windows. Click Here

CASE 2: IF YOU ARE NOT ABLE TO START WINDOWS AT ALL:

Follow the given steps to get back to your system at a previous state by restoring your system from an earlier backup and hence repairing your fatally damaged files. if the problems still persists, re-install your Windows 7.

METHOD 1: Use Safe Mode to restart Windows

Safe mode is the best troubleshooting option for any Windows that boots your computer with limited or basic files and drivers. After logging in the safe mode you can find the solution to the error which was not allowing you to start windows, Blue screen error in this case.
Step 1. Normally, click Start Button, Click the arrow on the right of the Shut Down button and Select Restart but when your windows is already stuck at blue screen just turn off and turn on the power button.
Step 2. Press and hold the F8 key as your computer restarts before the windows logo appears.If the Windows logo still appears, you will have to try again by restarting and waiting until the Windows log on prompt appears.
Step 3. Select Safe Mode and press enter on the Advanced Boot Options Screen.
Now log on to your computer using Administrator account and troubleshoot the problem.
System restart
System restart

METHOD 2: Fix Windows Startup Files using Startup Repair(Using pre-installed recovery)

Step 1. In normal conditions, click Start Button, Click the arrow on the right of the Shut Down button and Select Restart but when your windows is already stuck at blue screen just turn off and turn on the power button.
Step 2. Press and hold the F8 key as your computer restarts before the windows logo appears.If the Windows logo still appears, you will have to try again by restarting and waiting until the Windows log on prompt appears.
Step 3. Select Repair Your Computer and press enter on the Advanced Boot Options Screen.
Step 4. Select keyboard layout and click next.
Step 5. Click Startup Repair and follow the coming instructions on Systems Recovery Options Screen

CASE 3: IF NOTHING WORKS: RE-INSTALL WINDOWS 7

if you can’t recover Windows 7 at all, you can re-install Windows 7 using your installation disc and guide
All the programs,software and files you had in your system will be uninstalled and windows will be rebooted to original factory settings
Step 1. Turn on your computer and insert the Windows 7 installation disc.
Step 2. Shut it down and restart your computer.
Step 3. Press any key  and  follow the instructions appearing on the screen.
Step 4. Enter your language and other preferences on the Install Windows page, click Next, click I accept the license terms, and then click Next.
Step 5. Click Custom on type of installation.
Step 6. Click Drive options (advanced), on where do you want to install windows.
Step 7. Click the partition that you want to change and  formatting option you want to perform
Step 8. When you’ve finished, click Next.
Step 9. Finish installing Windows 7, follow the instructions carefully, Name your system and setup the administrator account.
For More Re-installation  information for Windows 7, Visit official Microsoft Site, Click Here
Re-installing Windows 7 is your last solution, go for it only when you are unable to find and troubleshoot the fatal error causing the blue screen of death to appear. I hope these solutions must have solved your error. Keep looking for this space for more solutions to Blue Screen Error.

Solve Slow PC Issues with Ready Boost

Solve Slow Speed PC Issues With Ready Boost

Are you constantly in dilemma of changing your RAM, or increase it by 1 GB, then stop for a while and read below, you are about to discover a simple and effective solution. And that solution is Ready Boost! Does the word sound familiar..?? If no, read on to find it out. Ready Boost is a disk cache component in Microsoft Windows, you simply need a flash memory like a USB Pendrive or SD card to serve the purpose.
There is no download or installation needed as the feature of Ready Boost is already inbuilt in Windows, Vista onwards. Incase your inbuilt system isn’t offering you this option you can externally download a software from any popular site by searching ‘ready boost for windows’ and install it by clicking next- next and finish at last.
An Interesting fact: Windows 7 can handle 8 flash memory devices for Ready Boost offering storage upto 256 GB.

1. Plug in the USB in the USB port

you see a AutoPlay dialogue box popped up asking you whether to open the folder to view files or use the drive for backup or speed up the system using Ready Boost. click on the third option.
31

2. Right click on the drive displaying your Pendrive

 Go to Properties-> Ready Boost->Use this Device
321 (437x594)
And move the cursor on the bar indicating how much space you want to reserve for your System speed which means it won’t be available for storage. This device functions as an extended cache memory (or an extended RAM, if you so please), thus files which are frequently accessed stay in there and are quickly accessible the next time you want to open it. It would have taken longer time had the file been fetched from the Disk.

3. To turn Ready Boost off, click on ‘Do not use this device’.

Umm i can sense some garden thoughts in your mind of replacing the RAM with this USB storage, but mind you USB storage is slower than RAM and this Ready Boost is useful when atleast you have some RAM. If you already have high RAM in your PC or Laptop then Ready Boost won’t be that helpful.
The same can be done a Ubuntu Linux PC while Mac people don’t bother this concept, rather they advise people to get a bigger SSD.

What to do When Computer Switches On but Nothing Happens?

In today’s world, everything is being computerized. Whether you are a student submitting his assignment, an employee working on a new project or just thinking of entertaining yourself by watching or listening to music, it can seriously be very frustrating if your computer or laptop won’t turn on. If someone asks what the symptoms of this circumstance were, the most common answer of the user is- nothing happens.
The reasons that can be little expensive are:
  • Some problem in your RAM.
  • Your motherboard is not working.
  • Your hardware needs replacement.
The viable solution can be to replace them. The following steps can help ease this procedure for you:
1.)    Check whether your laptop is plugged in: It happens many a times that the battery runs out and we forget to charge it well. So first step is very simple to follow, Charge it. If it still doesn’t work. Take out your battery (situated at the downward face of your laptop) and re-insert it. If it is a computer, check that it is plugged in properly.
2.)    Computer is on and it displays nothing:
  • For computer:When we turn on the computer there is sound of a fan moving. If you have a computer, check CPU, if it is on and you can hear the fan working then check whether your monitor is switched on too. A yellow light will be coming from a small indicator on the monitor. If your computer is on but nothing is displayed on the monitor. There is a chance your monitor is not working properly. Check it by connecting it with some spare monitor if available.Screen_n_power.svg
  • For laptop:If you have a laptop and it is on but nothing is displayed on the screen, do not panic. There can be various reasons for it. The most common and easiest to handle is that you pressed by mistake the projector shortcut key made on your laptop. Generally F1, F4 or F5 keys with a picture of laptop and projector depicts this. The solution to it is press it again. And if still doesn’t work, turn off your laptop, reinsert your battery and turn it on again. In most of the cases it works. Otherwise there is a possibility of hardware problem.
WP_000389
3.)    It turns on and off:
  • The first reason can be loose connections, reconnect your computer (check all the wires where it is going and note it on a piece of paper and then reconnect It). Take a help of more technological handy person if you can.
  • The second reason for it can be problem in the power button: This button is situated in the front of the computer’s case. There can be a possibility that it is shorting out. If you suspects there is a problem in it, replace it.Power_Button
  • For laptops: The most common reason is the temperature. If there is not a laptop cooler for it or no proper ventilation is provided then it can cause this. So turn the laptop off. Keep it cool for few minutes. Don’t charge it even. Then restart the laptop. See to it that temperature (over heating) is not soaring high this time. The other reason can be bad battery (try replacing it with some other one).
Know your limitations:
It should be taken care that a laptop or a computer is a device and we have professionals (especially trained people) to attend to our troubles. If these basic steps are not easing your problems then it is best solution to seek help from an expert or a professional. It is because there are some things that are beyond our abilities. Not everyone can be a technical expert. If the computer or your laptop needs repair, see to it that it is worthwhile. If it is costing you a lot, remember there is a chance it won’t be the first and last problem.

Shutdown PC From Desktop Icon: 3 Quick steps

The following steps will allow you to create a desktop icon to shutdown your PC!

Step 1

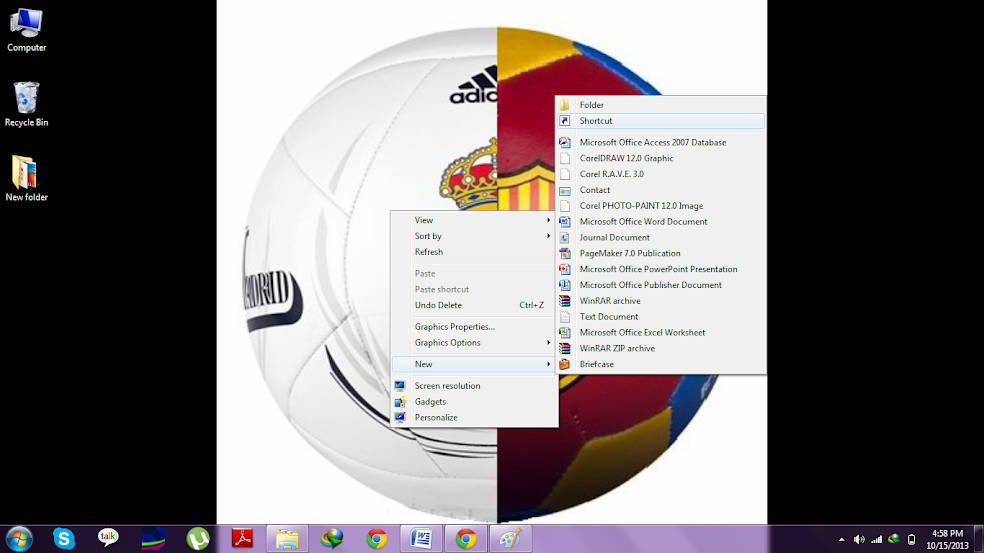
Right click on Desktop. Click on New > Shortcut
Nw Shortcut

Step 2

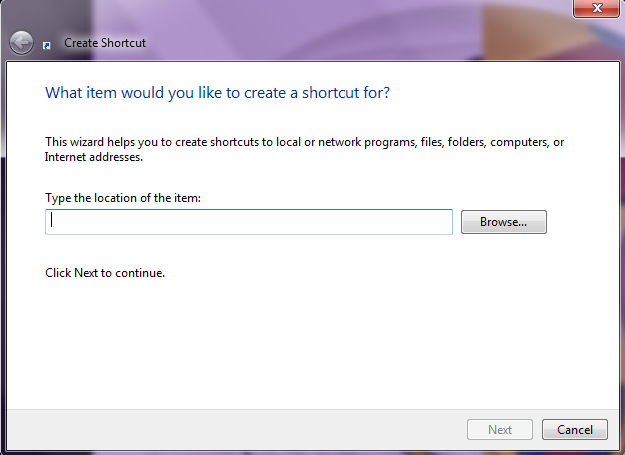
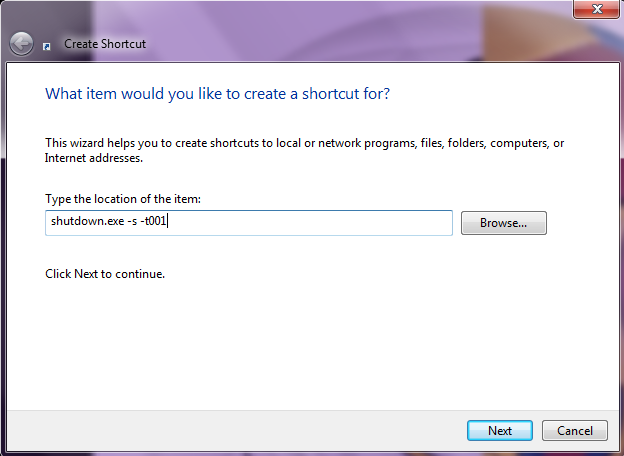
On the pop-up, type the exact words and click next: shutdown.exe -s
Shutdown shortcut
shutdown PC exe

Step 3

Give any name of the new icon created. Voila!
shutdown icon name

  • The shutdown.exe -s command means to shutdown PC whereas shutdown.exe -r means restarting your computer. You can replace s by r or create a new shortcut for restart.

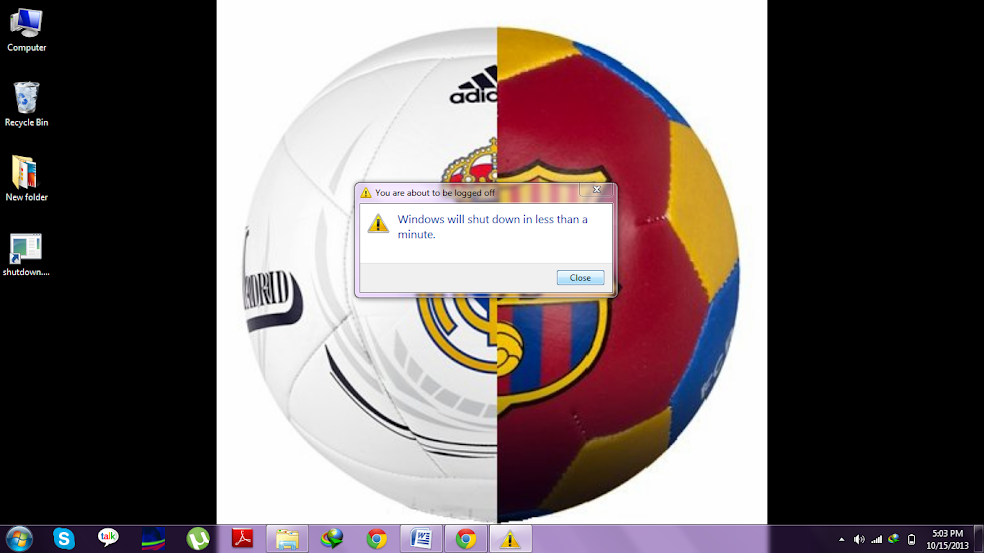
  • Computer shall shutdown PC in 30 seconds with shutdown.exe -s command. If you want to increase the time to 90 seconds, here is the code: shutdown.exe -s -t90. You just have to add -t and suffix the seconds.
shutdown timer
You can Hibernate, Sleep or even lock your computer using the above methods. Just change these codes in step 2:

  • Hibernate code: rundll32.exe PowrProf.dll,SetSuspendState

  • Sleep code: rundll32.exe powrprof.dll,SetSuspendState 0,1,0 

  • Computer Lock code: Rundll32.exe User32.dll,LockWorkStation
  • You can now see that a desktop shortcut is created that will Shutdown PC.

    click on shutdown exe
    shutdown PC
    Find the video of this tutorial below: